If this is your first time here, and you don’t know who I am, let me give you some context. I run a website called SwimUniversity.com. I built it in 2006. All caught up? Good.
In the middle of August 2018, I randomly logged into Swim University’s YouTube account and noticed NONE of my videos were monetized. I shouldn’t have been surprised since I was the asshole who turned off all the monetization.
My original reasoning was to spare my viewers of advertisements. But I don’t care about that shit anymore, so I turned the ads back on.
About 15 days later, I logged in again and was shocked by the amount of money I had earned.
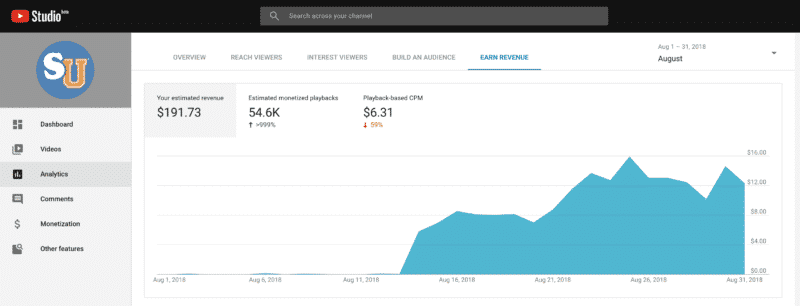
$191.73 in half a month. Not bad.
Then it hit me.
How much money had I missed out on all summer?! Hell, for the last few years?! I felt like a stupid idiot. Even more so than normal.
This was an obvious income source with real potential! But it would mean I would have to start making videos again.
Fuck.
Why I Stopped Making Videos In The First Place
I published my first real video for Swim University on May 30th, 2012. It was a long scripted video on how to open a swimming pool. Today, it has 215,760 views.
The second video I published a month later on June 19th, 2012 did even better. It currently has 829,836 views.
I made about 68 videos after that. And as I’ve mentioned in multiple podcast interviews, making videos was the catalyst to my success.
So why in god’s name did I stop?!
Making Videos The Hard Way
I don’t own a pool. But in order to make videos about pool care, I thought I needed a pool. And to do that, I had to rely on friends with pools.
That meant logistics. Bringing the equipment, writing the scripts, and trying to bulk film a bunch of videos in a single day. And those days were usually hot as balls!
https://www.youtube.com/watch?v=QwkLom4A9No
Those videos were hard to make and I gave up. Then, I moved to Colorado: the land of no swimming pools or friends (with pools).
Even after my move, I still wanted to do videos. But I needed a pool-less way to make them.
Making Videos The Easy Way
During my first few months in Boulder, all I had was my Apple Air and a podcasting microphone (ATR2100). So I used the built-in camera to film more pool videos.
I hated them.
While it was easy to film, they didn’t live up to my standards of quality. That said, some of them did really well despite how shitty they were.
This video about solar pool heating has over 350,000 views and was shot on my laptop in an Airbnb. You can see I’m clearly reading a script off my laptop screen. Amateur hour.
The last video I made like this was published on June 1st, 2016.
It’s now two years later. YouTube is clearly rewarding me for my past work, so I’ve decided to reinvest in videos again. But this time, I need to make video production easy, fun, and high-quality.
Let the experiments begin!
Making Pool Care Videos Again, Again
For the rest of 2018, my plan is to create some YouTube videos for SwimU. The channel has roughly 13,700 subscribers and continues to grow without any new uploads.
If I started uploading videos again, would I gain more subscribers? Would I earn more money per month?
I don’t know yet. But I gotta make videos without burning out or getting bored. So how can I make sure that doesn’t happen again?
I came up with a few styles of video to try. I wanted to see which one I found most enjoyable to make:
- Animated videos
- Quick-and-dirty “Talking Head” videos (like I did before)
- High-Quality “Talking Head” videos with animations
1. Trying to Make Animated Videos
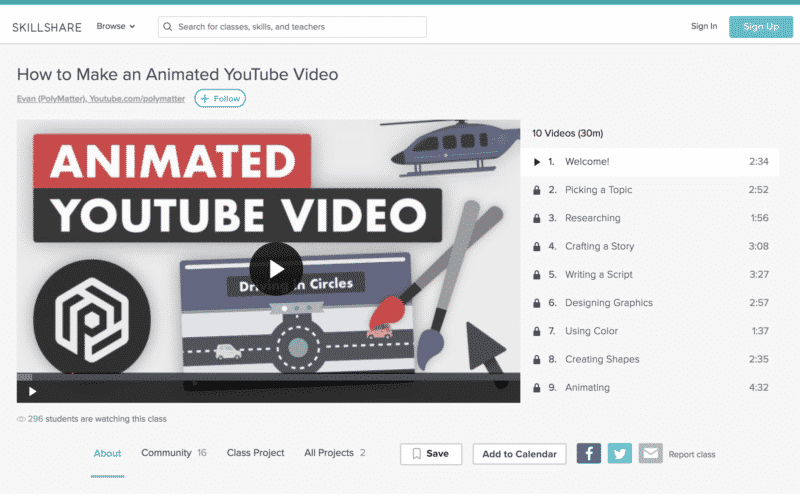
I was talking to Andrew (co-host of the Money Lab podcast) over Skype and he turned me on to this YouTube channel called PolyMatter.
Then he pointed me his video course on SkillShare. I watched the whole thing.
Now, I’ve done animated videos before using Apple Motion 5 and Adobe After Effects. But they’re a bitch! These videos take forever to make and even longer to render.
However, this dude mentioned he does all his animations using ScreenFlow.
ScreenFlow?!
That’s the same program I use for recording screencasts. I never even thought it would be useful for an animated video.
So I put it to the test.
Building a Scalable Template for Animation
Instead of just trying a few quick and dirty animations, I built a process first. After watching the course, I noticed a lot of the animated scenes were the same. That means, they can be repeated.
So I created a template which consists of multiple parts:
- Scripts: How to write and format a script. Or, in other words, how to turn any article into a video.
- Video Blocks: A collection of visual scenes that can be used for any part of a script.
- Rules: A series of must-do actions for every single video including how to use music and sound.
- Assets: A massive collection of pre-composed background animations, illustrated graphics, stock photos using 123RF.com and stock footage that can be used over and over again in all videos.
The original goal of building this out was to be able to hand off video production to almost anyone in the future.
But in the short-term, I was planning on doing all the work. And this just made it easier to make decisions faster as I was putting together the video.
Scripts
I worked with Steph (my GF) to come up with a standardized template for taking any Swim University article and turning it into a script. She’s better at storytelling than I am.
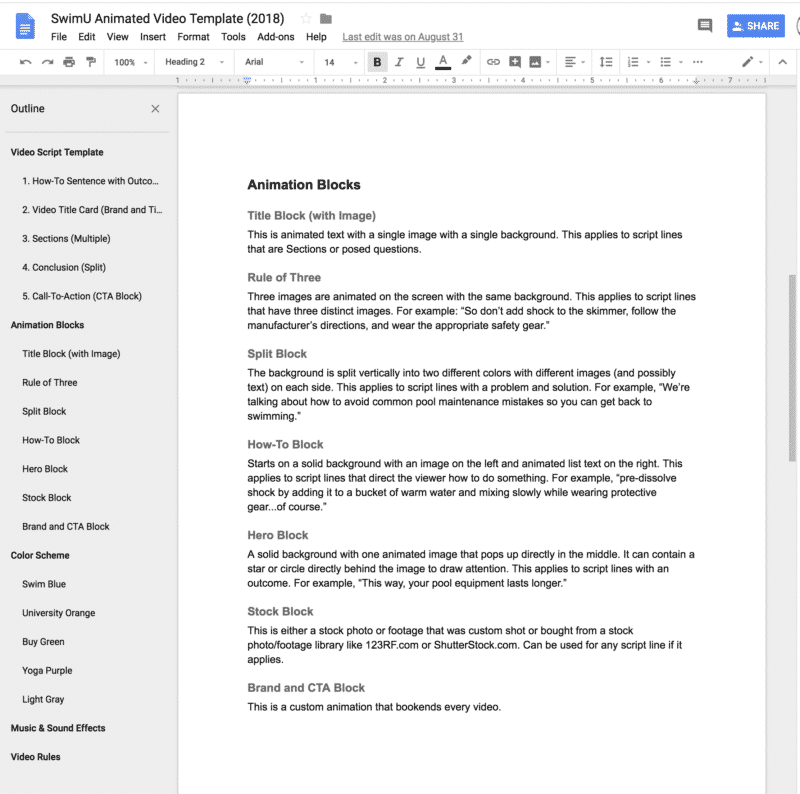
We came up with an outline to follow in Google Docs:
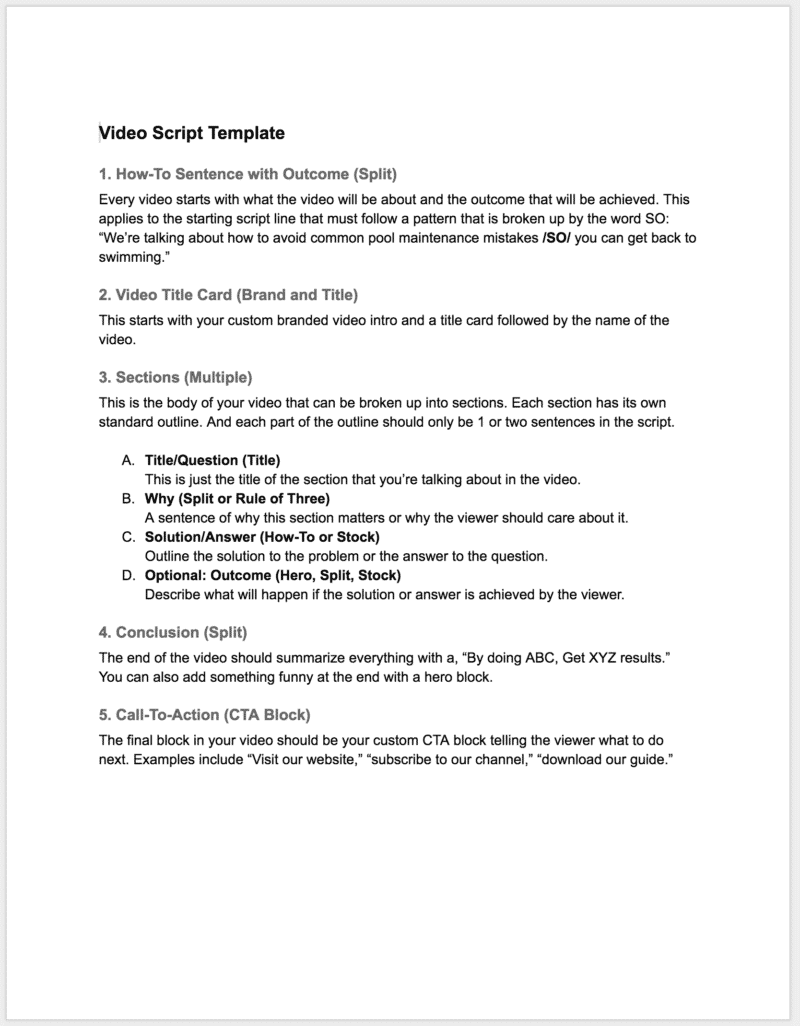
Next to each section, we had suggested Video Blocks, which is another term for standard animated scenes. This makes animation decisions much faster.
Video Blocks
We created seven different Video Blocks that an editor (or myself) can choose to display a scene.
Rules
Finally, I set up rules for an editor (or me) to follow. These are mostly to make each video look and feel consistent. Also, some of the rules are designed to make video production easier in the long-term.
- Music clips must be designed for looping. That means, music clips will end abruptly but will allow editors to copy and paste onto the end of a music track to extend the length.
- Every transition must include a sound effect to keep the energy high and to break up monotonous background music.
- Whenever an object appears on screen, it must have a very subtle sound effect. In SwimU’s case, either a bubble pop or whoosh sound.
- Backgrounds must have moving parts (crinkled or patterns). This will keep up the energy of the video.
- Split Blocks can use any color as long as the other color is gray.
- The same background animation/color video cannot be used consecutively.
Assets
I went through all my files and started collecting assets (graphics and footage). This is an ongoing process, but I decided to build a few things up front.
The first was animated backgrounds.
I used Adobe After Effects and some paid footage from RocketStock.com to create multiple backgrounds and transitions I could plug into any video. These assets where the base of every single scene and something I wouldn’t have to create from scratch each time.
Then, I started isolating images to use. These images were created by either me or my graphic designer over the last 10 years.
I also filmed a lot of b-roll in 2017 at my friend’s inground pool in New Jersey.
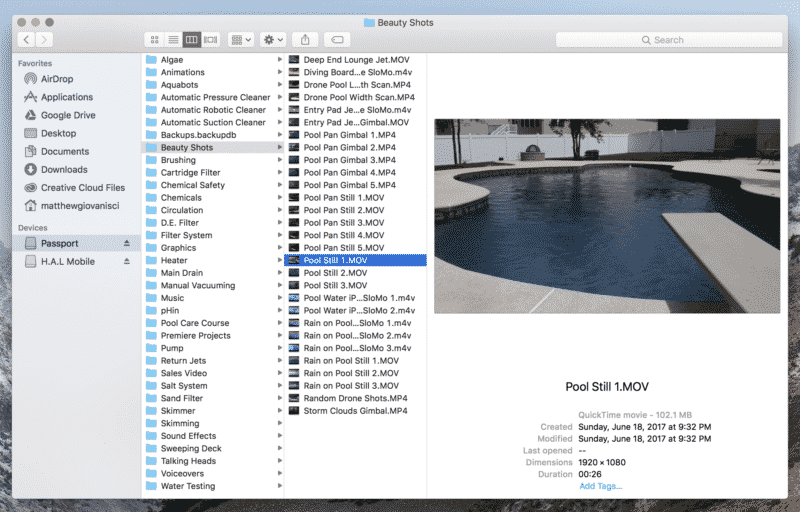
Finally, I composed my own music in Logic Pro X using simple loops.
Putting it All Together (First and Second Attempts)
After all the templating was complete, I tested it. I was working out a lot of bugs and fixing issues. So the first video took me three days to create.
I took this article, scripted it, and started building the video. Here’s the final product:
I showed it to a few people (Andrew and Steph) and they felt the video was kind of boring. I agreed.
The pacing was slow. I was trying to create the video as someone who doesn’t know much about editing and making something entertaining.
So I tried again.
This time, however, I had a really solid template to work potential. And I was trying to make a video as quickly as possible.
I was able to create the following video in a little over four hours from start to finish. That included scripting the article, composing the music, recording the voice over, animating, editing, uploading, and publishing on YouTube.
The biggest timesaver for me was during the scripting and voice over phases. I decided not to script this video out in detail. Instead, I created some bullet points from the article and started riffing into the mic.
I know the material, so this was easy to do. And it made the V/O feel more natural.
2. Trying to Make Quick-And-Dirty “Talking Head” Videos
Animated videos are certainly doable, but time-consuming. I wanted to try something that would be lightning fast. But first, I needed to invest in some things.
The Equipment
I knew the key to making these videos is ease of filming. If I had to spend time setting up lights, the camera, and the audio gear, it wouldn’t be worth doing all the time.
I moved my desk to the other side of the office so I can have more access to the natural light from the window. That took a full day to do – I got a big ass desk with lots of gear on it.
Then, I invested in a Rode Video Mic Pro Plus on my camera (Canon 70D) that would let me work with a single file of audio and video. And I bought a Joby Gorilla Pod for easy setup.

Now I don’t have to set up lights, audio gear, or even a tripod. I could just place the camera on my desk and hit record.
The Content
Since this was a Q&A video, I sifted through a bunch of past SwimU emails to find a question from an actual reader.
Then, when I started filming, a few things went wrong.
I couldn’t read the question because my computer was too far away. So I had to lean in and read, which meant I needed to hide on camera with a layover. No big deal, I wanted to do this anyway.
And when I finally played it back, the audio was fucking terrible!
I have pretty high ceilings and no cushy furniture. So it sounded like I was in a middle school gymnasium.
Didn’t matter. It was a test. I had to keep going and make improvements later.
Putting It Together
The following video took me only ONE hour to make from start to finish. But that’s pretty fucking clear if you watch it.
Once I was done filming, I exported the footage into my computer, imported to Adobe Premiere and just started editing as fast as possible.
This was the final product:
Some things I hate about this video:
- The Audio. It sucked. Although, depending on the speakers, it might not sound that bad. At least you can hear me. I’m just very picky when it comes to audio.
- The Background. It looked awful. I have my bathroom door open on the left (which didn’t help with the audio).
- My Outfit. I was wearing my trademark black hoodie in a video about fucking swimming pools. Duh!
- My Acting. I wasn’t confident about the material so I hesitate a lot. Plus the content was weak. I have zero energy.
I knew I could do better. But getting this done in one hour was promising. Now, I wanted to amp up the production quality and my on-camera skills.
Let’s try one more test.
3. Trying to Make High-Quality “Talking Head” YouTube Videos with Animation
There’s a challenge with “Talking Head” videos about pool care in an office setting: it just doesn’t “feel” like a pool video. I needed to figure out a way to add more swimming pool elements to the video.
But first, I wanted to address the audio problems.
Fixing The Audio
I just bought this $320 mic and you bet your sweet ass I was gonna use it. So I had to invest in foam acoustic panels for my walls. This helped a lot.
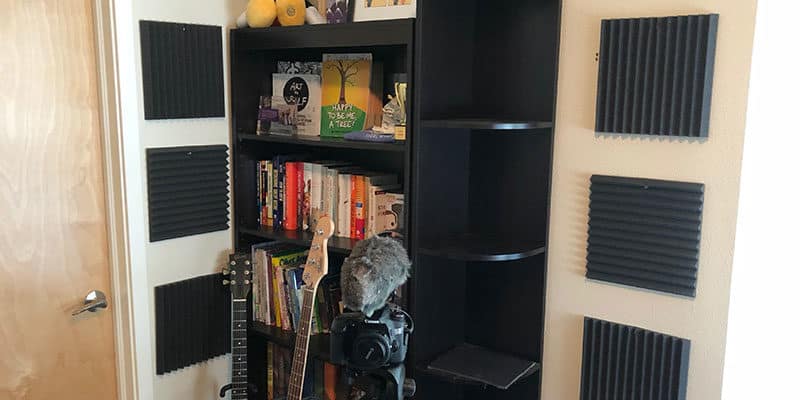
And the next time I filmed, I closed the bathroom door and removed my acoustic guitar. Basically, anything that would amplify my voice and make it bounce all over the room.
Then, I needed to address the background.
Fixing The Background
This was the biggest hurdle. I couldn’t figure out how to make a background feel “swimming pool-like” without being near a pool.
So I started searching for home improvement videos on YouTube for inspiration. I figured this would be the closest search to my niche.
Then, I ran into a very simple talking head video that looked like this:
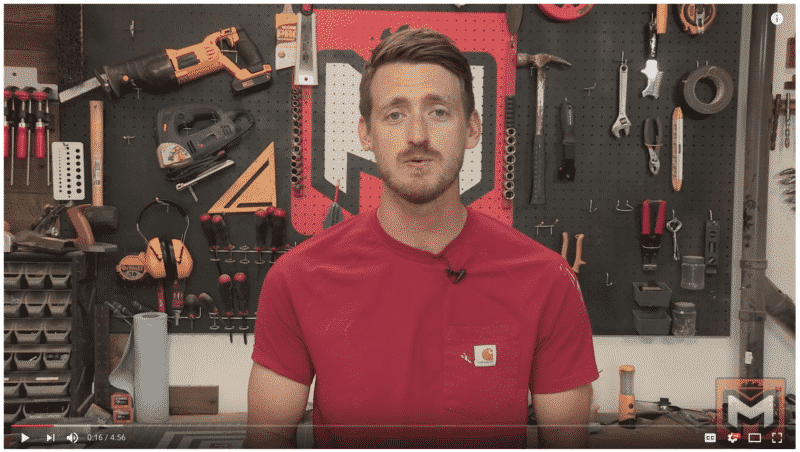
Clearly about home improvement and he’s standing in front of a workbench with tools. I didn’t even think I could just stand in front of a shelf of pool supplies!
I ran this idea by Steph. This would require me to kick her out of the office and buy more shit.
My original thought was to buy a section of backyard fencing as my backdrop. But Steph thought that might look cheesy.
I thought about just a fake wall with shelving units that had two sides to it. That way, I could create two different backdrops. But that would be expensive and I don’t know how to build things.
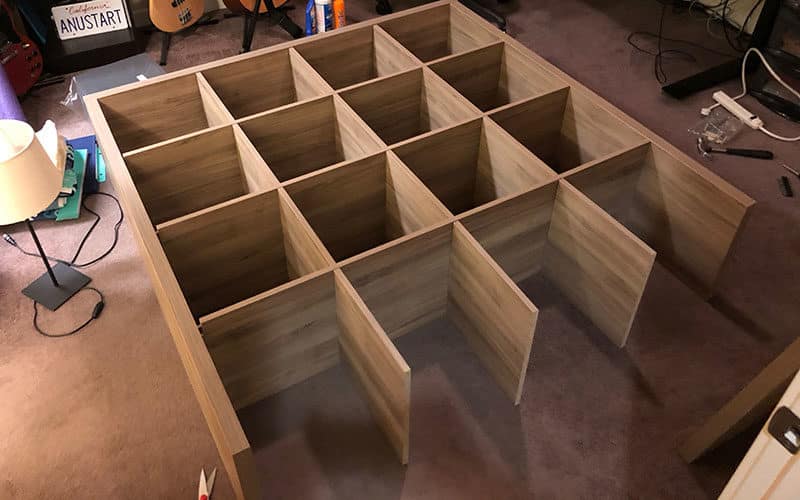
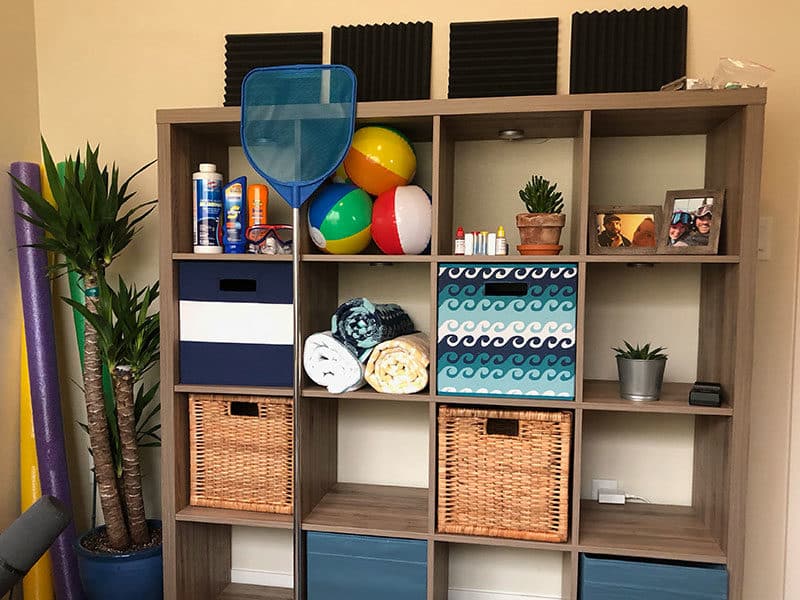
Then this Ikea piece came to mind because we already had two of them in our house:
With that in the background, I could add a bunch of pool shit in the cubby holes. And if I stopped making videos, it was still a useful shelving unit for any room.
It was settled. We drove to Ikea, Target, and the local hardware store the next day and bought:
- A Kallax Shelf Unit (Ikea): $109.00
- 2 Succulent Plants (Ikea): $28.98
- 6 Decorative Boxes (Ikea & Target): $53.94
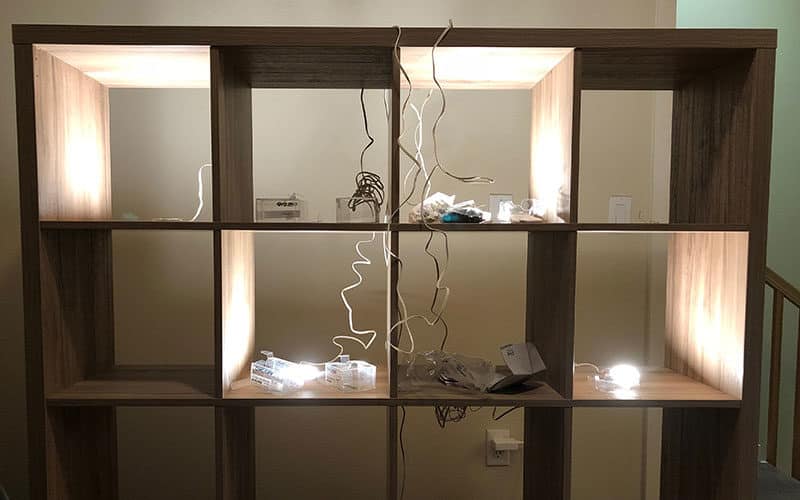
- 4 LEDs and String Lights (Ikea and McGuckin’s Hardware): $54.95
- A Pool Skimmer (McGuckin’s Hardware): $9.99
- 2 Bottles of Sunscreen (Target): $14.48
- 3 Beach Towels (Target): $25.97
- Pool Chemicals (Target and McGuckin’s Hardware): $28.33
- Googles (Target): $6.98
- Pool Noodles (Target): $8.34
- 12 Small Beach Balls (Amazon): $8.95
- TOTAL SET COST: $349.91
Luckily, since I was buying all this at the end of September, a lot of the pool items were on sale.
Jackpot, bitch!
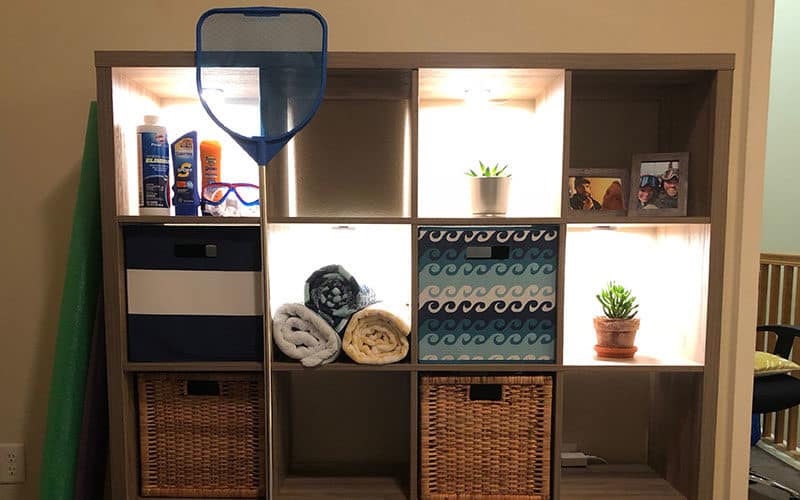
I know what you’re thinking. I’ve since added more beach balls 😉
Fixing My Outfit and Acting
The outfit was an easy fix. I had been rocking a Target Hawaiian dad shirt all summer (in Colorado) and knew it would be a better fit for a pool video than a black hoodie.
The acting was also an easy fix – just be better at it.
I grew up acting. I acted in high school. I act on two podcasts. I’ve acted in videos before. But I think I was so preoccupied with all the other production stuff that I forgot to be entertaining.
So for my first real video with the new background, audio setup, and outfit, I was ready to hit record.
Putting It Together
I picked a topic that I knew very well and would get a lot of views this time of year: air pillows for closing above ground pools.
I know, how riveting?
It did it in two takes with no script. The first take didn’t work because my camera autofocus settings were fucked and I forgot to turn on my sweet LED lights in the background.
The second take was a total of 10 minutes. When I imported it into Premiere, I widdled it down to just three minutes.
I really thought I was going to need a lot of additional b-roll and animations. But after watching it a bunch, I was pretty happy with it. There was a lot of energy and it didn’t need much.
I was able to create the entire video in under 4 hours, filming to publishing. That seemed short to me. But I liked it and that was shocking (also promising).
Some Additional Technical Details
There’s a couple of things I want to point out, perhaps to pre-answer some questions you may have about the entire video production.
- I used a Canon 70D with a 24mm fixed lens and one softbox light to film this.
- I didn’t use a script. Everything I said in that video came off the top of my head in the moment.
- I edited the video using Adobe Premiere with no color grading.
- I created the lower thirds animations with Adobe After Effects and exported them as “Essential Graphics.” This allows me to access them quickly in Premiere and change the text without going back into AE.
- I edited the square slide-in images in Adobe Photoshopped and animated in Premiere.
- I created the ending title card with Adobe Illustrator (where the logo was originally created) and ScreenFlow. ScreenFlow is surprising good for simple animations.
- I created the music for the title card many years ago in my father’s recording studio with a guitar, bass, and programmed drums in Apple Logic Pro X.
- I created the YouTube thumbnail in Illustrator.
Will This Be A Sustainable Way of Making Videos For Me?
Well, I’m just getting started. And all the expenses on the project, including the new camera gear, came to $820.39.
I should recoup my investment by the end of October, if not sooner.
I understand this is a long-term play. These videos are making money every month. And the more videos I have up there that get views, the more money I’ll make in the future.
This could be a very serious income stream for Swim University. And I plan on doing videos for Brew Cabin and Money Lab too.
In the end, I turned my entire office into a video studio, so I better fucking use it.